5 Minutes Guide to Get Your Picture Next to Google Results
Do you want to increase the number of people who click through to your website by up to 150%? Follow this 5 minutes guide to get your picture next to Google search results for your online training site or company website. Let me show you what I mean:

On Google’s website, if somebody types in TrainerTops blog, or any other query which leads to this blog, my portrait shows up next to the search results. There’s at least one study that suggests this little gimmick improves click through rates by up to 150%.
Now, my own portrait won’t result in a 150% increase of course, but you are much better looking than I am, so why not give it a shot? I mean, even if it does not really increase your click throughs, at least your potential customers will recognize you. This is especially important for you as a trainer, since you always have to sell not just your training but yourself as well.
So, here’s how to include your picture in Google’s search results real quick: create a Google account if you don’t already have one; add a photo; find your Google Plus URL; paste the Google Plus URL into your website; paste your own site’s url into your Google Plus Profile.
Okay, that was maybe a bit too quick, but don’t worry, we’ll take this one step at a time.
Step 1: Add Your Picture to Your Google Account
If you don’t have a Google account yet, go to google.com and click on the “Sign in” button.
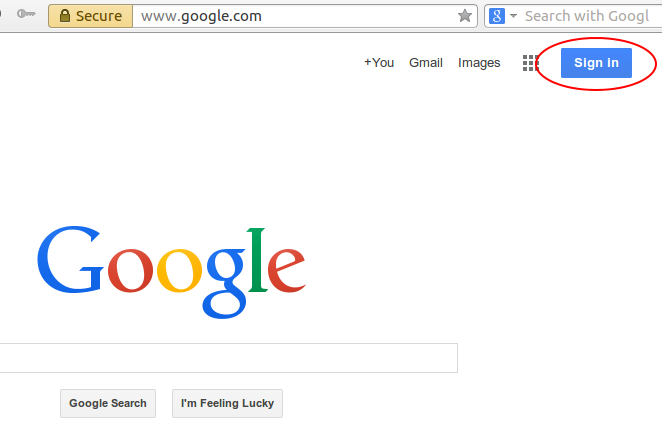
Use the Sign in button to create a new account (or sign in if you already have an account).
On the next screen, click on the “Create an account” link and follow Google’s instructions.
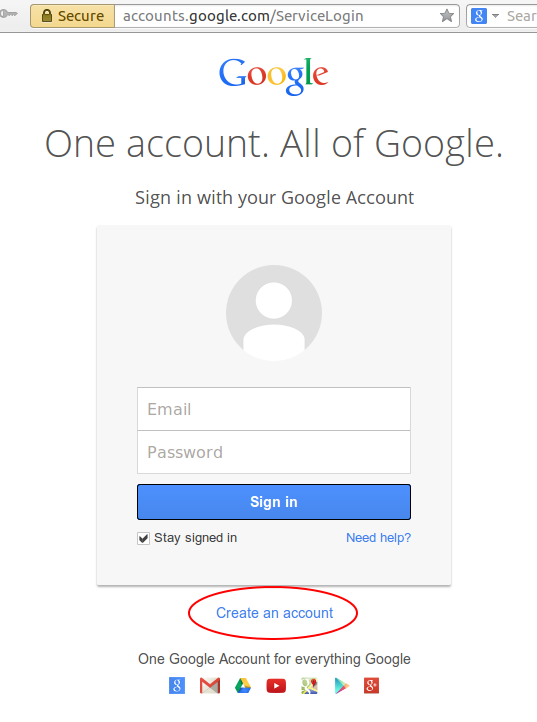
Now click the ‘Create account’ link
Pretty soon, you should be able to add your picture, by clicking on “Add a photo”.

After you have filled out a form, you’ll get to see this screen where you can add your picture.
Step 2: Paste Your Google Plus URL into Your Website
First, look up your Google Plus URL. Proceed to Google.com, sign in and click on your your own picture in the top right corner. Then click the “View profile” button.
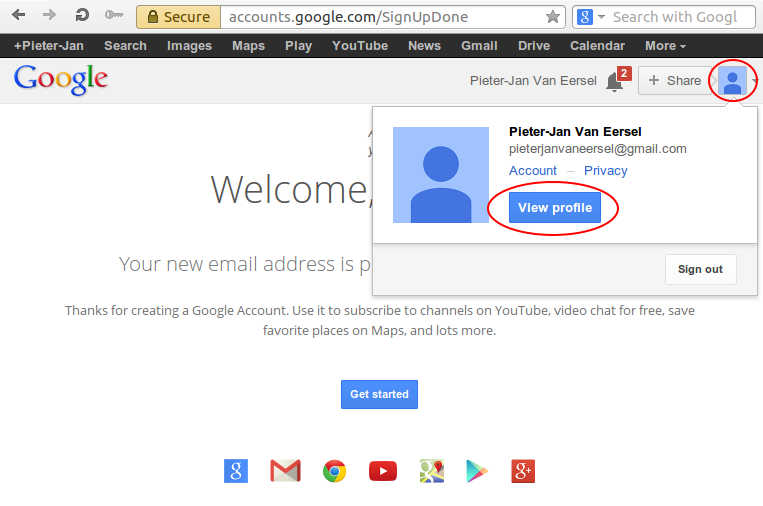
Click on your own portrait, then the View profile button.
Now, in the next screen, copy the url, minus the “/posts” part. Paste the copied url in Notepad or any other text editor.

Copy your Google Plus URL from the address bar of your browser.
The url should look something like this:
https://plus.google.com/u/0/102755877028915392448
It’s time to put this url in your website. There are two ways to do this:
- Edit the “source code” of your site, i.e. the html code
- Use your blog software or content management system to insert the url – I’ll use WordPress as an example
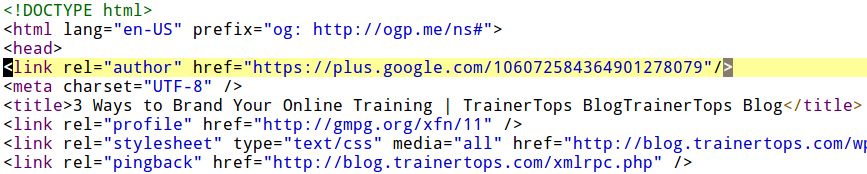
I’ll give you some more details for both methods shortly, but in both case you need to put the url into a so called “link” element:
<link rel=”author” href=”https://plus.google.com/106072584364901278079″/>
Just paste your own Google Plus url inside the quotation marks of the href to create your own link element:
<link rel=”author” href=”your url goes here”/>
Change the Source Code
If you have access to your site’s html code, you can paste the link element directly into the file that is responsible for your site’s header. This will typically be a file called ‘header.html’ or ‘header.php’ – but this may vary. If your site uses multiple html files containing a line with ‘<head>’ in it, you should add your link element in each of these files.
Insert the link element element directly beneath the line with the ‘<head>’ element. For example:
Paste the link element directly beneath the line with the tag ‘head’.
Once you have inserted your Google Plus URL, make sure that all changed html files are uploaded to your website.
Update the Header of Your WordPress Theme
If you are using software to edit your website, things should be slightly easier. Here, I’ll use the example of WordPress, which is blogging software.
Visit the /wp-admin/ section of your blog, then select Appearance > Editor. Now select the Header template of your theme.
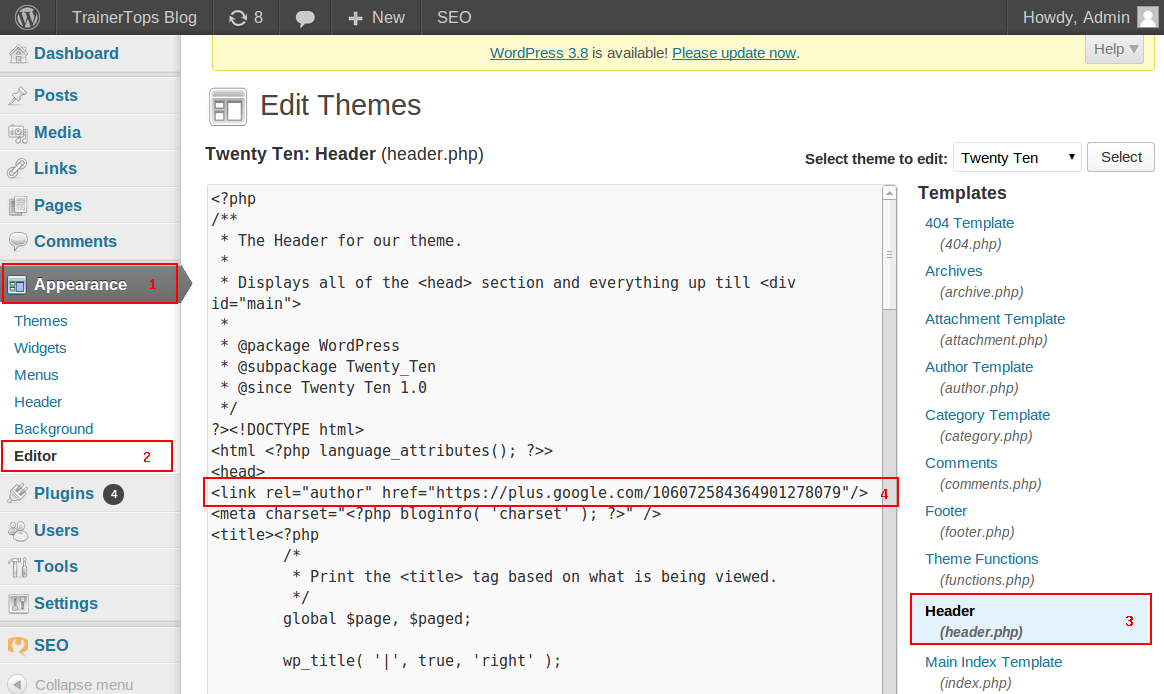
Insert the link element right underneath the line with the <head> tag. Don’t forget to click the button ‘Update File’ when you’re done.
If you are using a cache plugin, such as WP Super Cache, do not forget to delete the cache.
Step 3: Tell Google Plus About Your Website
In the final step, we tell Google Plus about our website. Go to your Google profile (e.g. by clicking on your portrait) and select the “About” menu option. Then, under “Links”, click the “Edit” link.

In the little window that pops up, select “Add custom link”.
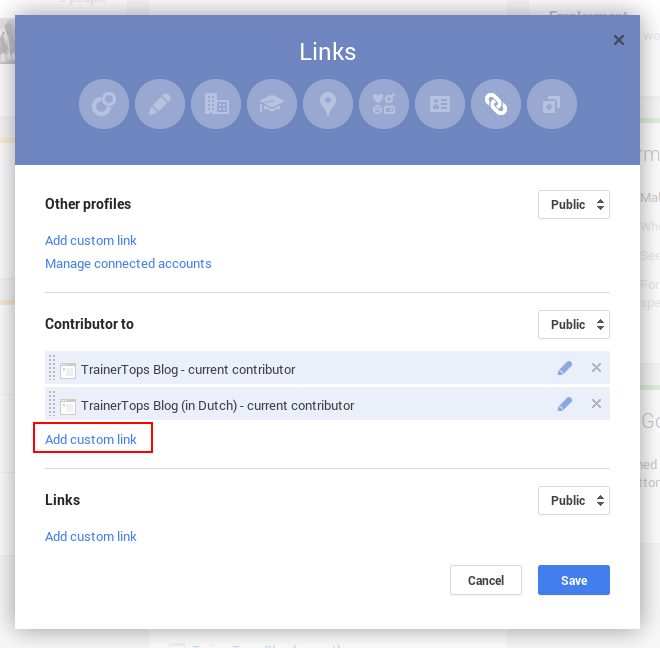
Under label, fill in the name of your site. For URL, type in the complete address of your website. Click the Save button and you’re done!
But I’m Not Seeing My Picture Anywhere!
Please keep in mind that your picture may not show up immediately in the search results. Google first has to crawl (re-index) your site again. If you don’t want to wait for this, you can ask Google to crawl your site right now. Here’s a guide to Ask Google to crawl a page or site. But even following this guide may not result in Google showing your picture immediately.
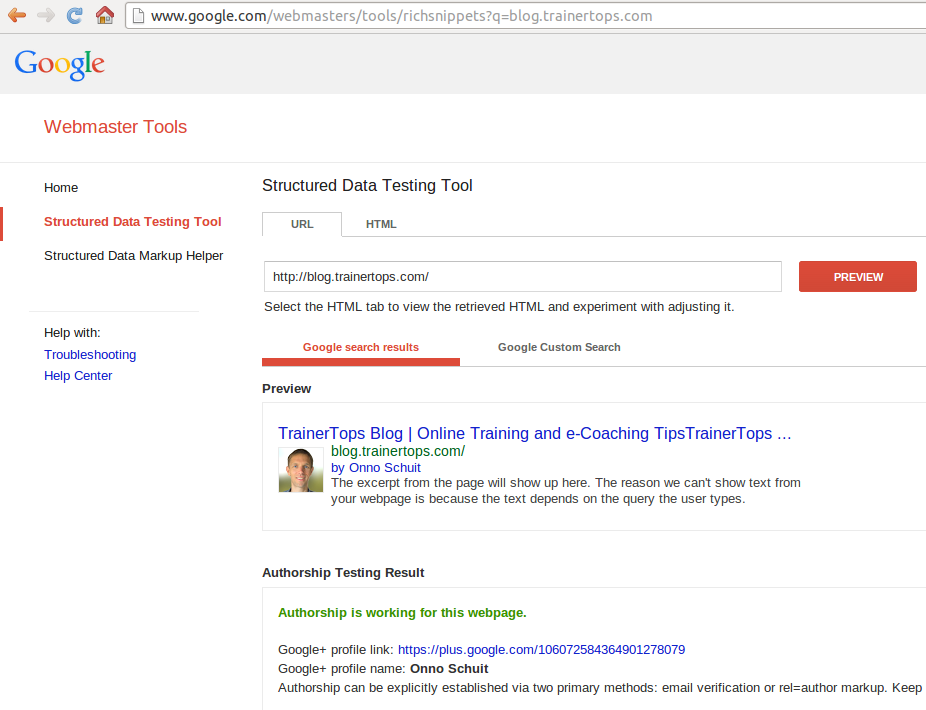
So, if you want to know if you did everything right, go to http://www.google.com/webmasters/tools/richsnippets and fill in the address (url) of your website. Hit the “Preview” button and you should see your own portrait.
5 Steps to Attract More Customers with Your LMS / Online Training Platform
Pingback: 5 Minutes Guide to Get Your Picture Next to Google Results — e-Learning Feeds()